From Lovely To Luxurious: Just Add a Touch of Gold!
Gold accents have a magical way of taking a handmade card from lovely to luxurious. It pairs beautifully with the warm autumn tones in the Sunkissed Delights Fresh Dye Ink Bundle. To balance the palette, I introduced Raspberry Dreams, a warm, rich pink, in the first card, and Green Opal, a mossy green with an earthy undertone, in the second. These shades already convey a sense of richness and warmth, and the touch of gold enhances that feeling even further. It’s a perfect combination for autumn-inspired designs — seasonal yet timeless, cozy yet elegant.
Hello Altenew friends, Hannelie here, and today, I’m sharing two variations of the same design idea—starting with a stamped version, and then stepping it up with a die cut element featuring the creative use of negative space. Both versions feature a golden underlayer that catches the eye and elevates the entire look.

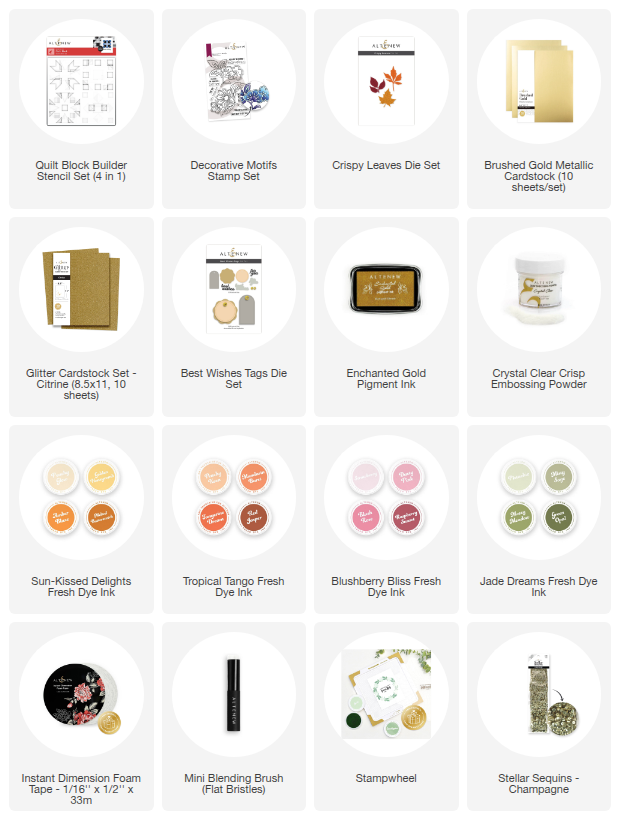
To make today’s cards you will need:
- White card stock
- Brushed Gold cardstock
- Citrine Glitter cardstock
- Vellum
- Quilt Block Builder Stencil Set
- Decorative Motifs Outline Stamp Set
- Crispy Leaves Die Set
- Best Wishes Tags Die Set
- Fresh dye Inks: Golden Honeycomb, Melted Butterscotch, Raspberry Sunset, Red Jasper, Green Opal
- Blending Brushes
- Enchanted Gold Pigment Ink
- Clear Embossing Powder
- Champagne Sequins
- Instant Dimension Foam Tape
- Adhesive of choice
- Die-cutting machine
- Stampwheel
- Heat Tool
- Paper Trimmer or craft knife
- Corner rounding punch
Step-by-Step Instructions to make the card with stamped detail.
1. Prepare the Card Base
Trim and fold a piece of white cardstock to create an A2 card base (4.25" × 5.5").
2. Create the Stenciled Background
Secure another piece of white cardstock to the sticky surface of the Stampwheel. Position the Quilt Block Builder Stencil Set over it and blend colors using blending brushes. I used Golden Honeycomb, Melted Butterscotch, Raspberry Sunset, and Red Jasper.
3. Stamp the Floral Image
With the background still secured in the Stampwheel, stamp a floral image from the Decorative Motifs Stamp Set using Enchanted Gold Pigment Ink.
4. Heat Emboss the Image
Remove the panel from the Stampwheel. Sprinkle Clear Embossing Powder over the stamped design, tap off the excess, and heat-set it with a heat tool until shiny and raised.
5. Trim the Panel
Use a craft knife or paper trimmer to trim the panel into a square measuring about 6.5 cm (2.6"). For a softer look, round the corners with a corner punch.
6. Prepare the Gold Mat
Trim a piece of Brushed Gold Cardstock to the same size (6.5 cm) and round the corners. Adhere this gold panel directly to the card base.
7. Attach the Stenciled Panel
Apply Instant Dimension Foam Tape to the back of your stenciled and stamped square. Adhere it slightly offset, leaving a slim border of gold cardstock peeking out from the top and left edges (see photo for reference).
8. Die-Cut the Sentiment
Use the “for you” die to cut the sentiment from Citrine Glitter Cardstock. Cut the shadow layer from vellum. Adhere the glitter layer on top of the vellum base.
9. Add the Sentiment
Adhere the completed sentiment to the right-hand side of the stenciled panel for a balanced design.
10. Embellish
Finish the card with a few sequins for sparkle.

Take a closer look:

Step-by-Step Instructions to make the card with die-cut detail
1. Prepare the Card Base
Trim and fold a piece of white cardstock to create an A2 card base (4.25" × 5.5").
2. Stencil the Background
Secure another piece of white cardstock to the sticky surface of the Stampwheel. Position the Quilt Block Builder Stencil Set and blend colors with brushes. I used Golden Honeycomb, Melted Butterscotch, Green Opal, and Red Jasper.
3. Trim the Panel
Remove the panel from the Stampwheel and trim it into a square measuring about 6.5 cm (2.6"). Round the corners with a corner punch for a softer look.
4. Die-Cut the Leaf Aperture
Select a leaf die from the Crispy Leaves Die Set and cut a leaf shape from the stenciled panel. This creates a leaf-shaped aperture that will reveal the gold layer beneath.
5. Prepare the Gold Mat
Trim a piece of Brushed Gold Cardstock to the same size (6.5 cm), round the corners, and adhere it to the card base with your preferred adhesive.
6. Layer the Panels
Apply Instant Dimension Foam Tape to the back of the stenciled panel with leaf aperture. Adhere it over the gold square, offset slightly so that a slim edge of gold shows on the top and left-hand sides—as well as through the leaf aperture (see photo for reference).
7. Create the Sentiment
Die-cut the “for you” sentiment from Citrine Glitter Cardstock. Cut the shadow layer from vellum and adhere the glitter layer on top.
8. Add the Sentiment
Adhere the completed sentiment to the top panel, positioned to the right for a balanced design.
9. Finishing Touches
Embellish with sequins to add sparkle and dimension.

Take a closer look:

One of the things I love about these designs is how the different gold finishes interact with one another. The Brushed Gold Cardstock has a smooth, satin-like sheen that creates a soft, luxurious backdrop. On the first card, the Enchanted Gold Pigment Ink paired with heat embossing adds a glossy, slightly raised detail that catches the light at different angles. For the sentiment, the Citrine Glitter Cardstock brings in a playful sparkle with a bolder, more textured surface. Together, these layers of gold — satin, glossy, and glittery — add depth and contrast, proving that even within one color family, variety in texture can completely elevate a design.

Design Tip to keep in mind : When working with gold, or any bold metallic element, a little really does go a long way. Especially in clean and simple card designs, using gold sparingly ensures it feels like an elegant highlight rather than overwhelming the entire card. A slim mat, a delicate embossed detail, or a glittery sentiment is often all you need to make the design feel polished and sophisticated while still keeping that clean and simple feeling.
I hope you feel inspired to add a touch of gold to your next project!
Happy crafting!