Paint-A-Flower: Rosa Floribunda Outline Stamp Set Release Blog Hop + Giveaway ($200 in Total Prizes)
by Lydia Evans October 22, 2021


Hello there, everyone! Happy Friday! Lydia here. Today, I'll be playing with the new Paint-A-Flower: Rose Floribunda Outline Stamp Set and creating my own sparkly watercolors.

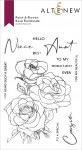
Paint-A-Flower: Rosa Floribunda Outline Stamp Set

There's nothing like the love between an aunt and her niece! This set features the gorgeous Rosa Floribunda flower in a stunning bouquet of roses and leaves. Color the florals with any medium of your choice and add one of the accompanying sentiments for a truly special project.
Along with this release are two exciting bundles for watercolor lovers – Paint-A-Flower: Rosa Floribunda & Artists' Watercolor 24 Pan Set Bundle and Paint-A-Flower: Rosa Floribunda & Watercolor Essential 12 Pan Bundle.
Don’t want to miss out on these beauties? Subscribe to the Monthly Subscription Plan NOW!

Subscribe to the Paint-A-Flower monthly release HERE and look forward to a monthly dose of florals for a great price! Don't worry if the set goes out of stock! When you are subscribed to the monthly subscription, you are guaranteed a spot for the new Paint-A-Flower Outline Stamp Set each month. New Paint-A-Flower sets are released on the 22nd of the month.
Stylish Cardmaking Techniques with Jenny | Video Tutorial

I started by stamping the large image from Paint-A-Flower: Rose Floribunda Outline Stamp Set onto a 4″ x 5 1/2″ panel of watercolor cardstock. I used Embossing Ink to stamp the images and then heat set using Platinum Crisp Embossing Powder. To create the sparkling watercolor look, I used Iridescent Shimmer Ink Spray as I would water. So I added this into a bowl to use easily. For the flowers, I used Rubellite and Ruby Red Watercolor Brush Markers and used the sparkly spray to move the colors about. For the leaves, I used Moss and Emerald Watercolor Brush Markers again with the spray to move the colors. Then for the background, I mixed the spray with Dusk Watercolor Brush Marker.

For the sentiment, I used Bold Thanks Die Set. I cut the larger piece using Vellum Translucent Paper. And the smaller die I cut 4 times, once from gold glitter cardstock and a few times from Navy Cardstock. I adhered all of the pieces together with the gold showing on top before adding this into place on my card.

To see how the card came together please watch the video below. Or over on YouTube:
Thanks so much for stopping by!
Giveaway Details

$200 in total prizes! To celebrate this release, Altenew is giving away a $50 gift certificate to 2 lucky winners and a $20 gift certificate to 5 winners! Please leave a comment on the Altenew Card Blog and/or each designer’s blog post on the blog hop list below by 10/28/2021 for a chance to win.
Altenew will draw 7 random winners from the comments left on each stop of this blog hop and announce the winners on the Altenew Winners Page on 10/30/2021.

Blog Hop List
Verity Biddlecombe
|