5 Mesmerizing Die Cutting Secrets for Realistic Flower Cards | Perfect Pairings with Jaycee + Video
by Jaycee Gaspar March 27, 2022


Die cutting layering florals can be an intimidating task, especially if you like realistic arrangements. In my Perfect Pairings with Jaycee video tutorial, I will share 5 secrets to getting realistic-looking die-cut flower arrangements.
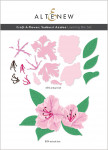
Die-Cut Layered Sunburst Azalea

1. Study the Correlating Flower, If Applicable
Before I start any die cutting, I get familiar with the flower. I Google image search Sunburst Azaleas for easy reference and keep my phone close to me while I craft to keep referring to color schemes and flower arrangements. Even if you do not die cut your flowers in the same colors, you can study the petal and leaf textures and bring those onto your card.
2. Research Your Die Cutting Set
Some Altenew layering die sets require a dark base and lighter detail layers (ie. Grand Anemone Layering Die Set). In my video example, the die cutting instructions include a light base with dark details for realistic blooms. Make sure you reference your layering guide on the Altenew packaging to ensure you are layering your die-cuts correctly.

3. Glue Die-Cut Layers to Cast Shadows
Think of cast shadows like a tree casts a shadow onto the ground on a sunny day. By curling and incompletely gluing down flower layers, these natural shadows give the appearance of curling petals and open blooms. Curl foliage elements too for overflowing die-cut bouquets.
4. Compose Life-Like Die-Cut Arrangements
I have a full Altenew Academy course all about Elements of Floral Composition. This class is full of my secrets that parallel realistic flower arrangements and balanced bouquets. These elements also apply to die cutting flower images.

5. Sentiment Focal Points
Now that you have a beautiful die-cut flower arrangement, adding the sentiment is just as important. I prefer grouping my sentiment with my die-cut bouquet; this way there is ONE focal point on my card. Make sure there is just enough contrast between your die-cut flowers and your meticulously placed sentiment.
Hope these floral die cutting tricks sparked your creativity today. Comment below if you know any more tips and tricks! Thanks for stopping by!
Materials and Supplies:
|