5 Best Inking Techniques You Need to Try Now!
Last Updated: January 17, 2024
Looking for the best inking techniques for your next card project? Look no further — our very own card makers and designers have some of the best ink techniques! Let’s take a look at the 5 best inking techniques you need to try now!
1. Rainbow Ink Smooshing

This ink smooshing technique is an easy but unique way to create a rainbow of colors for your cards. All you’ll need are cardstock, your water-based ink of choice, a watercolor palette, and a fine mist sprayer.
- Dab the inks onto the watercolor palette.
- Spray a fine mist of water on the inks and the cardstock panel.
- Gently press the panel onto the inks and leave it for a couple of seconds. Repeat it until you are satisfied with the color combination.
- Set the panel aside to dry, or use a heating tool to speed up the drying process.
And that’s it! Now you have a rainbow-colored panel that you can stamp designs on or die cut into different shapes for your cards! You can also add more inks individually on the panel if you want to emphasize certain colors.
| Pro tip: For a more amazing result, heat emboss an image with white embossing powder on the cardstock panel before you smoosh the colors in. Then, you can die cut or fussy-cut them to create a raised card design! |
Want to see this technique in action? Watch Erum’s tutorial on rainbow ink smooshing below!
2. Ink Swiping
Even simple inking techniques can produce wonderful results if you add some creativity to them!

This technique is as straightforward as the name suggests – take your ink and just swipe it onto your cardstock! Note that this would work best with raised ink platforms and that you can get deeper colors depending on the amount of pressure you apply as you swipe the ink.
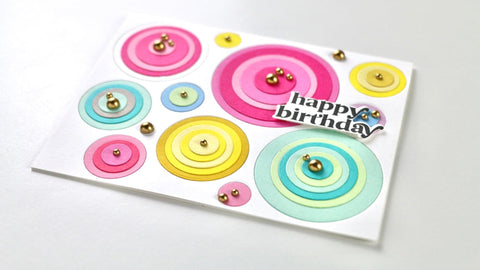
“But now what? Won’t I just have a panel with swiped ink?” Here’s where creativity comes in. You can now use layering dies to die cut shapes from the panel! Then, combine the different layers of your die-cuts, and watch a magical card design come to life.
But you don’t need to take our word for it, you can just see it for yourself! Here’s a tutorial video from Therese and how she made two gorgeous cards with this technique!
3. No-Line Ink Blending

Yes, this involves ink blending designs onto your cardstock without adding outlines. No-line ink blending is actually not too difficult to achieve and produces stunning results, with the help of layered stencils.
To start with, take the first layer of your layered stencil and ink blend directly onto your panel. Then, take the next layer and carefully line it up with the first layer, like how you would a jigsaw puzzle.
The trick is to find the right sections where the design’s edges “fit”. Watch Jenny’s video below to get a better idea of how you can do this.
Repeat the process for the rest of the remaining layers until the design is complete. You can die cut the design, or add any embellishments you like, as well as sentiments, to give it a personalized feel!
4. The “Glow” Effect

This time, we're switching it up. Normally, when we talk about "inks", we often refer to our line of water-based inks—Fresh Dye Inks, Crisp Dye Inks, and Pigment Inks.
But beyond that, we do have other types of inks available, which are just as versatile, and can help you craft projects that are just as beautiful and stunning, too!
For this ink technique, we’re using alcohol inks and a Dura-Lar transparent sheet. A Dura-Lar sheet is non-porous, similar to acetate, and is heat-resistant (which is going to be important later).
- Cut your Dura-Lar sheet to size (for this example, the sheet was cut into the shape of a tag).
- Hold the sheet flat side up and apply some isopropyl alcohol with a dropper.
- Add a few drops of alcohol ink onto the sheet with isopropyl alcohol.
- Next, swirl the Dura-Lar tag slowly to achieve an “ocean wave” effect.
- Once you’re satisfied with the spread of the color, use a heating tool to dry the sheet. Note: You can repeat the inking process on different areas of the sheet with different colors to create an ombré effect.
- Finally, to make it “glow,” add white cardstock to the back of the transparent panel. Since we're making a tag, use a piece of twine to tie up the tag through the hole at the top. That way, the Dura-Lar tag “floats” on top of the cardstock, making the effect glow even more.
To see this technique in action, watch Michelle’s tutorial video here:
5. Realistic Ink Blending
Finally, for the last technique today, we're back to good ol' Fresh Dye Inks, and we have Jaycee’s inking techniques to create a “realistic” look for your card designs.
As Jaycee underlines in the video, there are 5 “secrets” to achieving a realistic card design:
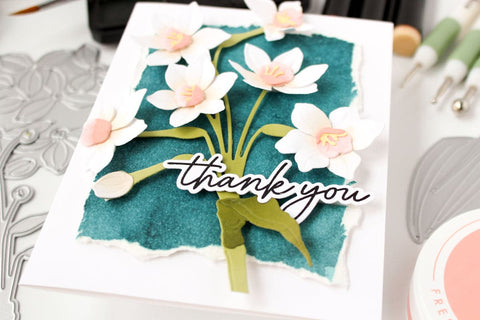
- First, a little research goes a long way. If you’re making a floral card design (like the example above), you can go on the internet and look for variations of the flower and look at details – the colors, the arrangement, how they bloom, and more.
- Study your die-cutting and layering set. Learn what kind of colors your base should have, which details should have darker colors and more.
- Glue the die cut layers in a way that they cast shadows. If possible, slightly curl some of the areas of your die-cut while incompletely gluing down the layers.
- Arrange your die-cuts like how flowers arrange themselves in real life. Use your research, take inspiration from actual flowers outside, or learn how to arrange them with this cardmaking class!
- Add your sentiments as close as possible to the focal points, to draw and keep attention to the focal point. Make sure that the sentiments have enough contrast to the focal point, as well.

And that’s it — 5 amazing inking techniques you can try now! We hope you enjoyed and learned a lot in our blog post today.
But the fun doesn’t stop there! If you want to learn more about inking or find more ink-spiration, don’t hesitate to drop by In the Craft Room and get more ink techniques, tips, and tricks. Happy inking!
FREE eBook: Everything You Need to Know About Inks for Paper Crafting
2 comments
In This Article
More Crafty Reads & Inspirations
-

Starting 2026 With a Clean Slate and Using Up Leftovers
-

January 2026 Inspiration Challenge
-

Simple Tips To Bring Your Die Cut Florals To Life - A Touch of Sparkle With Carissa Wiley
-

3 Secrets for No-Outline Watercoloring: The Art of the Disappearing Line | Perfect Pairings with Jaycee
-

Card Ideas that Symbolize New Beginnings


Thank you so much, Debbie! We, especially our designers, really appreciate the love. Hope these projects inspired you to craft more! 🤗
Beautiful cards and tags! Love them all!!!