Easy Snapshots Layout
I love digging through older photos and bringing them to life. I get to document those precious moments, have fun creating, and reliving the times when my boys were little. This photo was taken nearly 9 years ago when my son was 6. I just love his soft dreamy look.
 For my layout, I used the following products:
- Papers from the Our Family Scrapbook Collection and Reflection Scrapbook Collection.
- Stamps and dies from the Snapshots Stamp and Die Set.
- For the title: Super Script Scrapbook Stamp and Die set.
 How to:
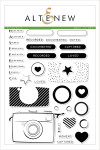
- Stamp the camera and some embellishments using the Snapshots Stamp Set and cut them out with the coordinating dies from the die set.
- Pick patterned papers that match your photo. I went with three papers, working with a blue, grey, and purple color combination. My background paper is from the Reflection Scrapbook Collection.
- Stamp your title using one of the words from the Super Script Scrapbook Stamp Set and cut it out. I went with Jet Black and Dew Drops inks, creating a shadow effect. I had to fussy cut the word as the die wouldn't fit due to the shadow I added. You could just stamp the colors separately and layer them to create the shadow.
- Combine the different elements to create a layout. I created a layered centerpiece with my photo and added the embellishments to the top and bottom for a vertical design. To create flow, I added two strips of blue patterned paper at the top and bottom. These two elements ground the final design.

 I really enjoyed creating this layout and I am happy to add it to my son's many scrapbooks.
Thank you so much for stopping by.
Happy scrapping.

SUPPLIES USED:
|