Wax Seals Satisfying First Attempt with Soft Peonies Wax Stamp
Curious about trying wax seals but feeling a bit intimidated? Don't worry, it only seems difficult from afar, but it's a totally beginner-friendly process, not to mention stunning and incredibly fulfilling!
Hello from Scotland! This is Bibi Cameron, and I was encouraged by the Altenew Team to try their wax seals for the very first time.
I actually have quite a few wax stamps and all the tools to work with them, but somehow, I had never given it a go until now.
In conclusion, it was so much easier to do than I ever imagined!

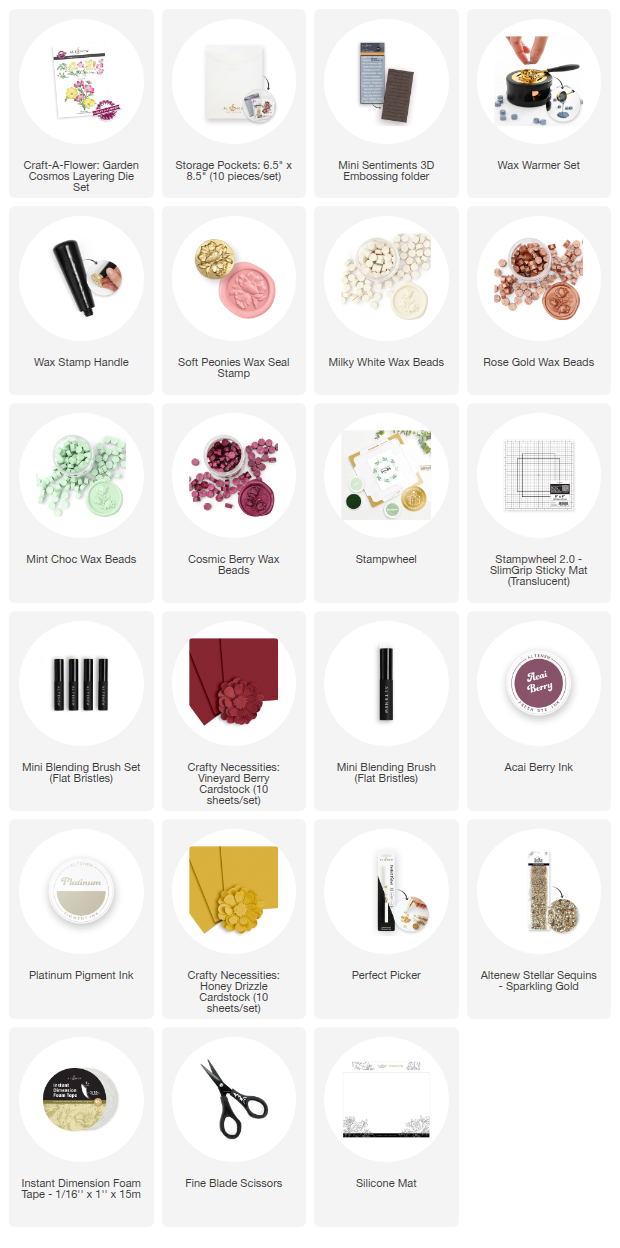
Cards Recipe
MAIN SUPPLIES
PAPER
- Neenah 110 lb Card Base
- Sand Colored Cardstock.
- Crafty Necessities: Vineyard Berry Cardstock
- Crafty Necessities: Honey Drizzle Cardstock.
- Crafty Necessities: Reindeer Moss Cardstock.
- Crafty Necessities: Jet Black Cardstock
INKS
EMBELLISHMENTS
- Gold Thread and Twine
Working on the Wax Seals

I began by experimenting with wax seals, and to my surprise, the wax melted quickly. Faster than I had expected. it was also very easy to clean with a dry kitchen towel while still warm (one of my biggest worries!).
To maintain the right temperature for cleaning and layering wax seals, I place my palette knives on an electric cup warmer. It keeps them gently heated, making it easier to smooth or remove excess wax without overheating it. Because the surfaces (stamp, spoon, etc.) can become hot during the process, you must exercise caution when cleaning them so you don’t burn yourself.
You can make a wax seal in a single color, or go for multi-colored. The key to multi-color is working with warm or hot tools.
The wax must be fluid enough to adhere, yet controlled so colors don’t blend unintentionally.
As this was my first experiment, I spent a lot of time testing the timing and temperature to get it right. To add multiple colors to a single wax seal, here’s one effective method:
Use the wax stamp like a mould: pour the first (base) color of wax into the stamp.
Remove excess wax using a hot palette knife (or similar) while the wax is still pliable.
You can use masking (tiny strips of paper or tape) to block off areas so they don’t receive wax, which simplifies cleanup.
Alternatively, after the first color cools slightly, remove the wax from the stamp and trim away any excess bits or small unwanted fragments with sharp scissors.
Place the trimmed pieces back, and pour more wax of a second color to fill in gaps or overlay.
Repeat for each wax color layer used.
Let it cure/ cool down. Then, pour wax over a non-sticky surface and press the stamp over it (jiggle it a little bit so the wax moves uniformly towards the edges of the stamp).


Tips & Considerations
- Use a heat tool to gently rewarm the wax if it starts to harden and you’re unable to remove the excess.
Although the wax is easy to remove when it is dry, you can also use the help of your heat tool to heat it up and clean your tools after each use.
Don’t overheat the wax: If the wax is too hot, it can bubble or burn, which compromises the finish.
Time your stamp press: Leave the stamp in place for ~15–30 seconds to allow the wax to cool and set before gently lifting.
Finishing the Cards

I wanted to keep these cards simple, so I used the Craft-A-Flower: Garden Cosmos Layering Die Set to create bold die-cut flowers and leaves.
I die-cut Crafty Necessities: Vineyard Berry cardstock for the flower petals, and after assembling them, I added a hint of Acai Berry Ink to the centers and Platinum Ink to the edges.
I added the flower centers and the stems/branches that I die-cut from the Crafty Necessities: Moss Cardstock.
I also added embossed sentiments made using the new Mini Sentiments 3D Embossing Folder to emboss a piece of black cardstock, then highlighted the raised letters with Platinum Ink for a subtle metallic sheen.


To attach the wax seals to the cards, I poured a small amount of melted wax directly onto the surface and then pressed the finished seal on top.
Regular glue or tape adhesives don’t adhere well to wax, so this method works best for a secure hold.

That is all for now, Thanks for stopping by and hanging out with me today! I hope you were inspired. And until next time, I hope you have a fabulous day!
Happy Crafting
Bibi

Just a reminder that Altenew has an ongoing promotion for you to get FREE U.S. Shipping on orders over $29! Just reach the amount in your cart, and it'll automatically be applied!
On the other hand, international crafters can also get $10 off shipping on orders over $129 with code FORYOU10 at checkout. These offers are available from October 23, 2025 at 12:01 AM EST until October 25, 2025 at 11:59 PM EST. Shop HERE!
SUPPLY LIST