Spring Floral Cards: Die-Cut vs Stamped Background Look
by Erum Tasneem April 6, 2026
What if you could create two completely different cards using the exact same floral images?

Hi friends! Erum Tasneem, and today I’m sharing two fresh spring floral cards featuring the Craft Your Life Project Kit: Delicate Garden. Both cards use the same stamped images and ink colors, but the final results look completely different thanks to two simple background techniques.
One card features a fully stamped panel with a rich colored background, while the other uses die-cut florals layered over textured cardstock for added dimension. Let’s get started!

VIDEO: Two Ways to Style Floral Cards for Spring
Watch the video tutorial below or CLICK HERE to learn more about this cardmaking technique! Or read step-by-step instructions after the video.

Card 1: Spring Floral Card

Inking the Images
- Stamp all three floral images from the Craft Your Life Project Kit: Delicate Garden onto an A2 panel of Classic Crest Solar White Cardstock using Obsidian Pigment Ink.
- Fill any gaps using smaller images from the set to create a full floral background.
Tip: Use a light hand when layering inks for softer blends

- Stencil the flowers using the coordinating stencils:
- Layer 1: Apply Pink Diamond Fresh Dye Ink to the largest flower
- Layer 1: Add Pinkalicious Fresh Dye Ink softly from the center outward (optional)
- Layer 2: Deepen with Rubellite Fresh Dye Ink
- Layer 1: Finish with Razzleberry Fresh Dye Ink
-
For yellow and orange flowers:
- Base layers: Citrus Burst and Snapdragon Fresh Dye Inks
- Detailed layers: Honey Drizzle (switch to Maple Yellow if you want vibrant yellow flowers), Terracotta Fresh Dye Inks
- Stencil the leaves using the coordinating stencils:
- Base layer: Limeade Fresh Dye Ink (keep tips lighter)
- Detailed layer: Reindeer Moss Fresh Dye Ink
Tip: Don’t hesitate to layer darker inks over different base colors for variation

Color the Background & Add Finishing Touches
- Fill the background using Evergreen Artist Alcohol Marker.
- Use:
- Bullet tip for tight areas
- Brush tip for larger areas
- Small circular motions for a smooth finish
- Add a sentiment from the Creative Labels Stamp and Die Set and embellish with Mother of Pearl Gem Sparkles.
Tip: Choose a background color that contrasts with your image tones, and use circular motions with alcohol markers to reduce streaks

Card 2: Die-Cut Spring Floral Card with Textured Background
Create the Floral Elements & Prepare Background
- Stamp and color two floral clusters using the same inks listed above, then die cut them.
- Cut an A2 panel from Mountain Pine Cardstock.
- Add horizontal score lines starting at 2.75 inches
- Continue scoring at ½-inch intervals
- Blend Mountain Pine Fresh Dye Ink around the edges and soften inward.

Assemble the Card
- Adhere the panel to the card base
- Attach florals using Instant Dimension Foam Tape
- Add sentiment and Mother of Pearl Gem Sparkles

I love how these two spring floral cards show that even when you use the same stamps and inks, your design choices can completely transform the final look.
Whether you prefer a full stamped background or dimensional die-cut florals, both approaches offer a fresh way to create beautiful floral cards. You can also easily adapt these designs for different occasions by simply switching the sentiment.
Which background style do you prefer — stamped or die-cut? Let me know!

Thanks so much for stopping by! Happy crafting!
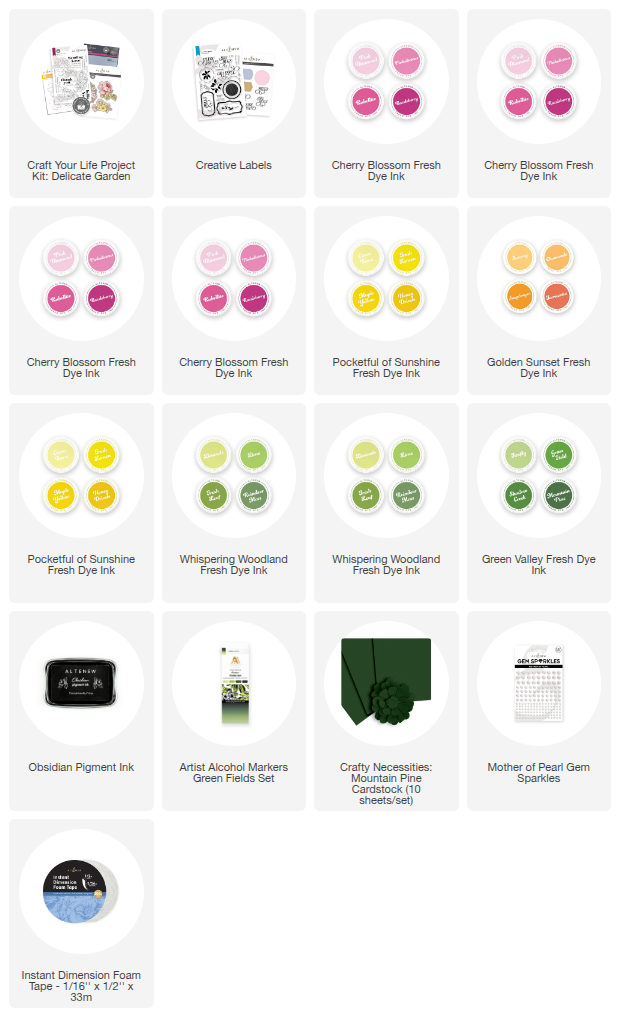
SUPPLY LIST