Spotlight Coloring: A Fun Way to Add Color to Projects (With Video Tutorial)
Last Updated: September 24, 2025
Today is National Coloring Book Day, so we're grabbing all of our fun supplies like coloring books and pens to make a beautiful project!
Hello there, Michelle here with another edition of Terrific Tags with Michelle. Today, I have a fun technique to share - spotlight coloring! With this technique, you color only part of an image (like shining a spotlight down on a stage!), and it gives a fun look to any project!

Creating the Coloring Spotlight Effect
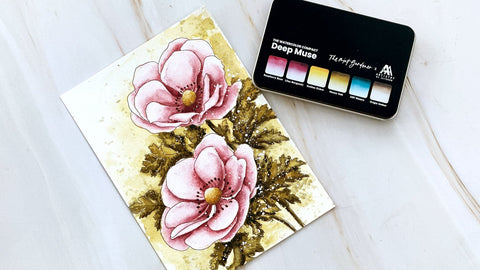
I started off my card by creating the spotlights to color. I took a page from the Botanical Elegance Capture the Colors of Nature Watercolor Coloring Book and cut it down to 4.25" x 5.5".
I then took the Halftone Circles Nesting Die Set and placed three on top of my panel, holding down with tape, before running it through my die-cutting machine.
This then gave me the spotlights for where to add the coloring.

Spotlight Coloring
I colored the spotlight circles using Dual Tip Pens and a Fine Watercolor Brush. I scribbled the pen onto The Petal Palette and then mixed it with water using the paintbrush. I then applied it to the circles.
I used Baby Pink (Zanzibar set), Fuchsia (Islands of Fiji set), and Rubellite (Tahitian Terrace set) for the flower petals.
I used Fresh Lemon and Snapdragon for the flower centers. I then used Bamboo, Grass Field, and Emerald for the foliage.

Creating the Tag
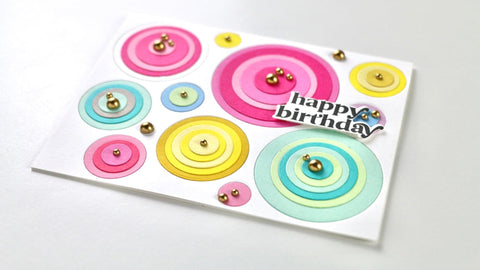
I punched a hole in the top of the bottom circle to make it into a tag. This isn't necessary but does add an extra touch to the card!
I threaded black twine through the hole and tied in a bow at the front. The panel (the parts without the coloring), was adhered to an A2 sized white card base with Glue Tape.

Assembly of the Spotlight Coloring & Adding a Sentiment
I die-cut more circles from Watercolor Paper and adhered these inside the openings on the card (for added dimension). The watercolored ones were then adhered on top.
When they are placed on top, the image becomes one again, lining up the lines of the image with the background.
I stamped a sentiment from Sentiment Strips 3 Stamp Set onto Crafty Necessities: Jet Black Cardstock using Embossing Ink. I applied Pure White Crisp Embossing Powder and heat set. It was cut into a strip and adhered to the card over the spotlight tag at the bottom.
To finish, I embellished with Stellar Sequins - Clear Iridescent.
Video Tutorial: Spotlight Coloring
I hope I have inspired you to try spotlight coloring. It is such a fun technique! I used circles today for my spotlights, but you can use any shape! You can watch the video tutorial below or over on YouTube.
Thank you so much for stopping by today, I hope you have a wonderful day!
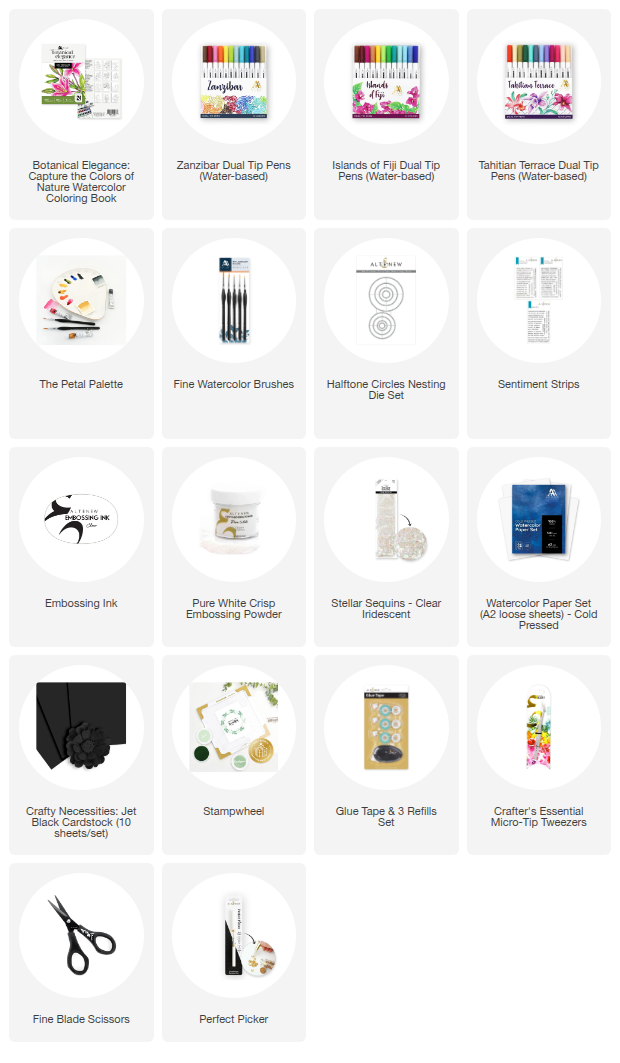
SUPPLY LIST

In This Article