Stretch Your Supplies with Mini Delight : Garden Friend - Minimal Waste, Maximum Creativity
Hello Altenew friends! Hannelie here, and today I’m sharing a little trio of projects that all began with one stamp and die set and a single design idea!
I pulled out the Mini Delight -Garden Friend Stamp & Die Set — with its sweet chipmunk and versatile foliage — and ended up creating not just one card, but two cards and a coordinating tag. I love when a set makes it easy to stretch your creativity while keeping things simple and cohesive!
The Garden Friend stamp set features a sweet, easy layering chipmunk and a variety of sentiments for different occasions. The Garden Friend die set features a variety of sizes and different shaped leaves as well as a cluster of small acorns and one larger acorn.

For this trio, I leaned into warm autumn tones — golden yellows, caramel browns, and deep ruby red, aspiring to capture the vibrant hues of the season! The combination brings a cozy seasonal feel while keeping all three projects beautifully coordinated.
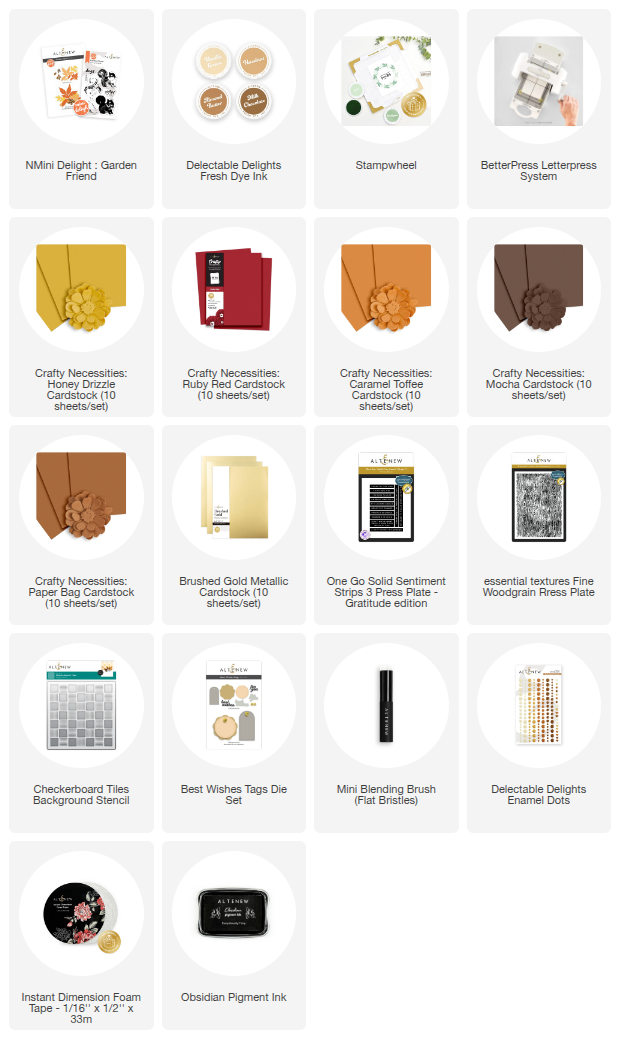
To make todays cards and tag you will need:
- White card stock
- Stampwheel
- Die cutting machine
- Betterpress Letterpress System
- Mini Delight – Garden Friend
- Circle Die
- Delectable Delights Fresh Dye Ink Bundle
- Card stock: Honey Drizzle, Caramel Toffee, Ruby Red, Mocha, Paper Bag & Brushed Gold.
- One-Go: Solid Sentiment Strips Press Plate & Coordinating Die
- Essential Textures: Fine Woodgrain Press Plate
- Best Wishes Tags Die Set
- Checkerboard Tiles Background Stencil
- Blending Brush
- Delectable Delights Enamel Dots
- Adhesive of choice
- Instant Dimension Foam Tape
- Obsidian Black Ink
- Twine
Step by step instructions to make the “Grateful for you” card:
- Prep the card base.
Trim and fold white cardstock to create an A2 size card (4.25" × 5.5) - Cut the front panel.
Trim a second piece of white cardstock — this will be your textured panel/frame. - Create the woodgrain background.
Ink the Fine Woodgrain Press Plate with Milk Chocolate Fresh Dye Ink and run the 4" × 5.25" panel through your BetterPress per the manufacturer’s instructions. - Cut the circle aperture.
Use the 7 cm circle die to cut an aperture from the woodgrain panel in the desired position. Keep the die-cut circle for a second card or element. - Mark the stamping placement.
Position the apertured panel over the folded base where you want the focal point to show through. Lightly trace the inside edge of the circle onto the base with a soft pencil, then remove the panel. - Stamp the chipmunk on the base.
Using the Stampwheel, stamp the chipmunk directly onto the card base, following the layering guide: begin with the lightest shade (Vanilla Cream) and build up to Milk Chocolate for the final detail layer. - Stamp the sentiment.
Stamp the sentiment in Obsidian Black ink. - Frame the scene.
If needed, make sure the textured panel measures 4" × 5.25" (this leaves a small border around the A2 base). Apply Instant Dimension Foam Tape to the back of the upper panel and adhere it to the card base to frame and ground the chipmunk. - Die-cut foliage and acorns.
Use the leaf die to cut leaves from Honey Drizzle, Caramel Toffee and Ruby Red. Cut acorns from Mocha and Paper Bag cardstock. - Build the cluster.
Arrange a small cluster of leaves and acorns at your chosen spot around the aperture (you can even tuck a few pieces under the frame edge for depth). Adhere with your chosen adhesive. - Finish off.
Add enamel dots to balance the layout.

Step by step instructions to make the “Thanks a Million” card:
- Prep the card base.
Trim and fold white cardstock to create an A2 size (4.25" × 5.5"). - Add the focal point.
Take the leftover circle from the first card, add Instant Dimension Foam Tape to the back, and adhere it to the top center of the card base. - Create the sentiments.
Ink the One-Go: Solid Sentiment Strips Press Plate with Milk Chocolate Fresh Dye Ink and run it through your BetterPress system. Use the coordinating die to cut out all the strips. (Tip: keep the extras stored safely — they’re perfect for quick future cards) - Arrange the leaves.
Position the leftover die-cut leaves on the circle background. Play with the arrangement until you like the balance, then adhere them with your adhesive of choice. - Add the sentiment.
Choose a sentiment strip, and pop it over the leaf cluster with foam tape for dimension. - Finish.
Embellish with a few enamel dots to complete the look.

Step by Step Instructions to make the “Thanks” tag
- Die-cut the tag.
Use a tag die from the Best Wishes Tags Die Set to cut a tag from white cardstock. - Stencil the background.
Position the Checkerboard Tiles stencil diagonally across the tag and ink through it with Milk Chocolate Fresh Dye Ink to create a partial background. - Add the reinforcement.
Die-cut the small ring from Brushed Gold cardstock and adhere it around the tag’s top hole to reinforce it. - Add leaves and sentiment.
Arrange the last leftover leaves from the previous projects on the tag, then adhere them. Trim down one of the sentiment strips (from the One-Go set) so it fits neatly across the tag, and adhere it in place. - Finishing touches.
Embellish with enamel dots and thread twine through the top to complete the tag.

Take a look at the completed projects:

The Garden Friend Stamp & Die Set really shines with its easy-to-layer chipmunk and the variety of foliage that can be used in so many ways. Add in a few clever cuts and some re-purposed leftovers, and you’ve got three unique projects with minimal waste and maximum creativity.
I hope you feel inspired to dive into your own stash, reuse leftover pieces, and discover the joy of minimal waste with maximum creativity.
Happy crafting!